
Run a Single Slice Basic Reconstruction#
Input file for This Example#
The NXtomo of this tutorial can be picked in /data/projects/tomo-sample-data/training/workspaces/[date]/[user_id]/PROCESSED_DATA/basic_reco/
Step 0: When Using ESRF Infrastructure#
Make sure you have a version of tomotools available:
module load tomotools
Step 1: Launch Tomwer Canvas#
Once on a cluster-node you can run:
tomwer canvas
[1]:
from tomwer.resources.video import Video

Video("rnsMClEMNcY", height=500, width=800)
[1]:
This tutorial focuses on datasets coming from BLISS. Therefore, we will only consider the NXtomo case.
However, be aware that processing can also be done with Spec-EDF, either natively or once the Spec-EDF has been converted to an NXtomo.
Step 2: Load the Workflow to Process Reconstructed Slices#
From the tomwer canvas top menu select the workflow already defined for reconstructing a slice locally:
Examples -> simple use cases -> simple slice reconstruction
[2]:
from tomwer.resources.video import Video

Video("RB2yF4s_jS4", height=500, width=800)
[2]:
This workflow contains the following widgets:
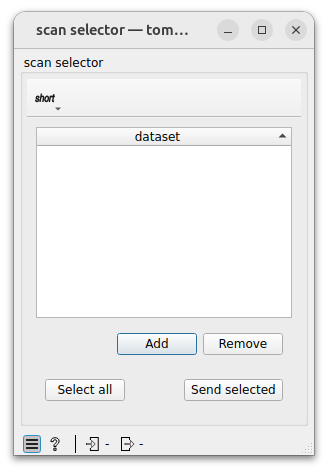
Scan Selector:

Allows selection of one or multiple scans (either NXtomo or Spec-EDF).
Reduced Darks and Flats:

Computes the mean of dark frames and the median of flat frames to enable flat field normalization later in the workflow.
Center of Rotation: (see the ‘cor_search’ notebook for more information)

Computes the center of rotation (CoR) of the scan either manually or automatically.
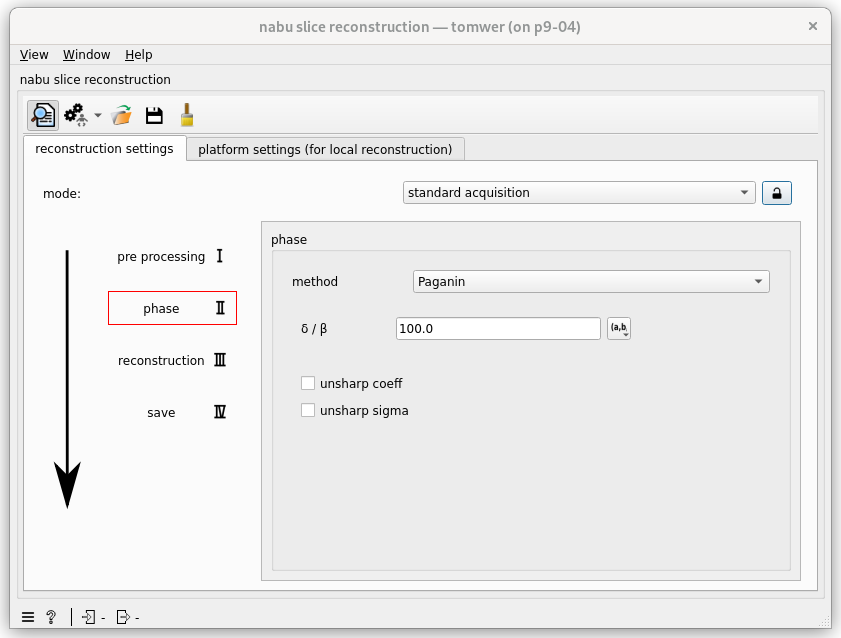
Nabu Slice:

Used to reconstruct specific slices. You can specify reconstruction parameters here.
Data Viewer:

Displays raw data and reconstructed slice(s).
Note: You can add a new widget from the left panel by left-clicking on the widget or by dragging a link from the node output to a downstream widget.
Step 3: Fine-Tune the Workflow#
Center of Rotation: Select the
sliding-windowalgorithm and lock it .
.Nabu Slices: Add some Paganin phase retrieval.
Step 4: Add the NXtomo to be processed#
Add the NXtomo contained in /data/projects/tomo-sample-data/training/workspaces/[date]/[user_id]/PROCESSED_DATA/basic_reco/ to be processed to the Scan selector either by:
clicking ‘Add’ from the interface
or drag and drop a file to the interface
or copy / paste some file path / scan identifier
Note: The same works for other format like EDF/SPEC.
Step 5: Run the Workflow#
From the Scan Selector, select the scan and press send selected. This will trigger the workflow.
Wait for the different steps to be processed and check the outputs.
Step 6: Reconstruct a subset of the volume#
Add the
nabu volume reconstructionto the canvasDefine the subset to be reconstructed
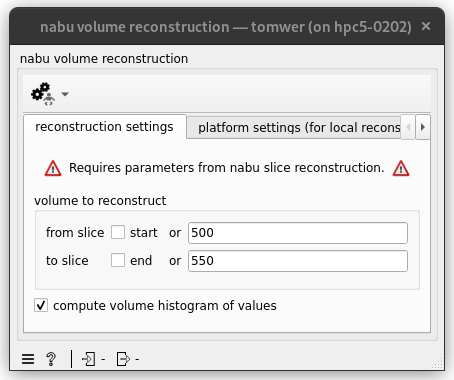
Connect it to the workflow
Connect the volume reconstruction to the workflow only once the subset is defined. Else you might reconstruct the entire volume.
(Optionaly) connect the
volume viewerto thenabu volume viewer
Step 8 (Optional): Launch the Same Processing on Slurm#
You can launch the same processing on Slurm by:
Adding a Cluster Configuration widget as the input to Nabu Slices.
Adding a Cluster Monitor widget as the output of Nabu Slices.
Retriggering the processing.
[3]:
from tomwer.resources.video import Video

Video("sxGarNwmGRE", height=500, width=800)
[3]:
[ ]:
Step 9 (Optional): Add a Widget to Convert from BLISS Acquisition to NXtomo#
9.1 add the nxtomomill-h52nx widget#
Currently, you only have a BLISS-HDF5 file that needs to be converted to the NXtomo format. To achieve this, you can use the nxtomomill h52nx tool.
Follow these steps:
Add a
nxtomomill-h52nxwidget.
Connect it to the Scan Selector.
[4]:
from tomwer.resources.video import Video

Video("LrlwwNUwR1g", height=500, width=800)
[4]:
9.2: Convert BLISS Raw Data#
Double-click on the
nxtomomill h52nxwidget.Add the BLISS-HDF5 file:
/data/projects/tomo-sample-data/training/workspaces/[date]/[user_id]/RAW_DATA/basic_reco/bambou_hercules_0001.h5. → Custom output folder
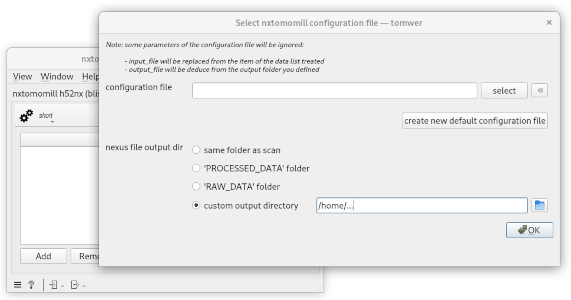 → Custom output folder
Select the file(s) to be converted and press send selected.
Note: Usually, you will already have the NXtomo (e.g., from the data listener  ) or you will process data from the RAW_DATA folder. But for this training you need to specify the output folder. An alternative is to use
 nxtomomill nx-copy CLI. For example:
nxtomomill nx-copy /data/projects/tomo-sample-data/training/part1_basic_reco/bambou_hercules_0001.nx [output_folder]
[ ]: